Avocado Toast Grilled Cheese

Last week on my Facebook page, I asked for your feedback on what kind of posts you wanted to see on Take A Bite. One request was for "trendy grilled cheese." I can handle that, I thought. (Not to mention I've had a random weird craving for a grilled cheese and tomato soup).

I wanted to come up with something relatively simple, but something original. I'll be honest I'm not a huge sandwich person, but I do love a good piece of avocado toast. It hit me one day while I was on a walk. An avocado toast grilled cheese!!! I went speed walking home to go research. Not very productive for my workout but whatever, grilled cheese were more important at the time. 

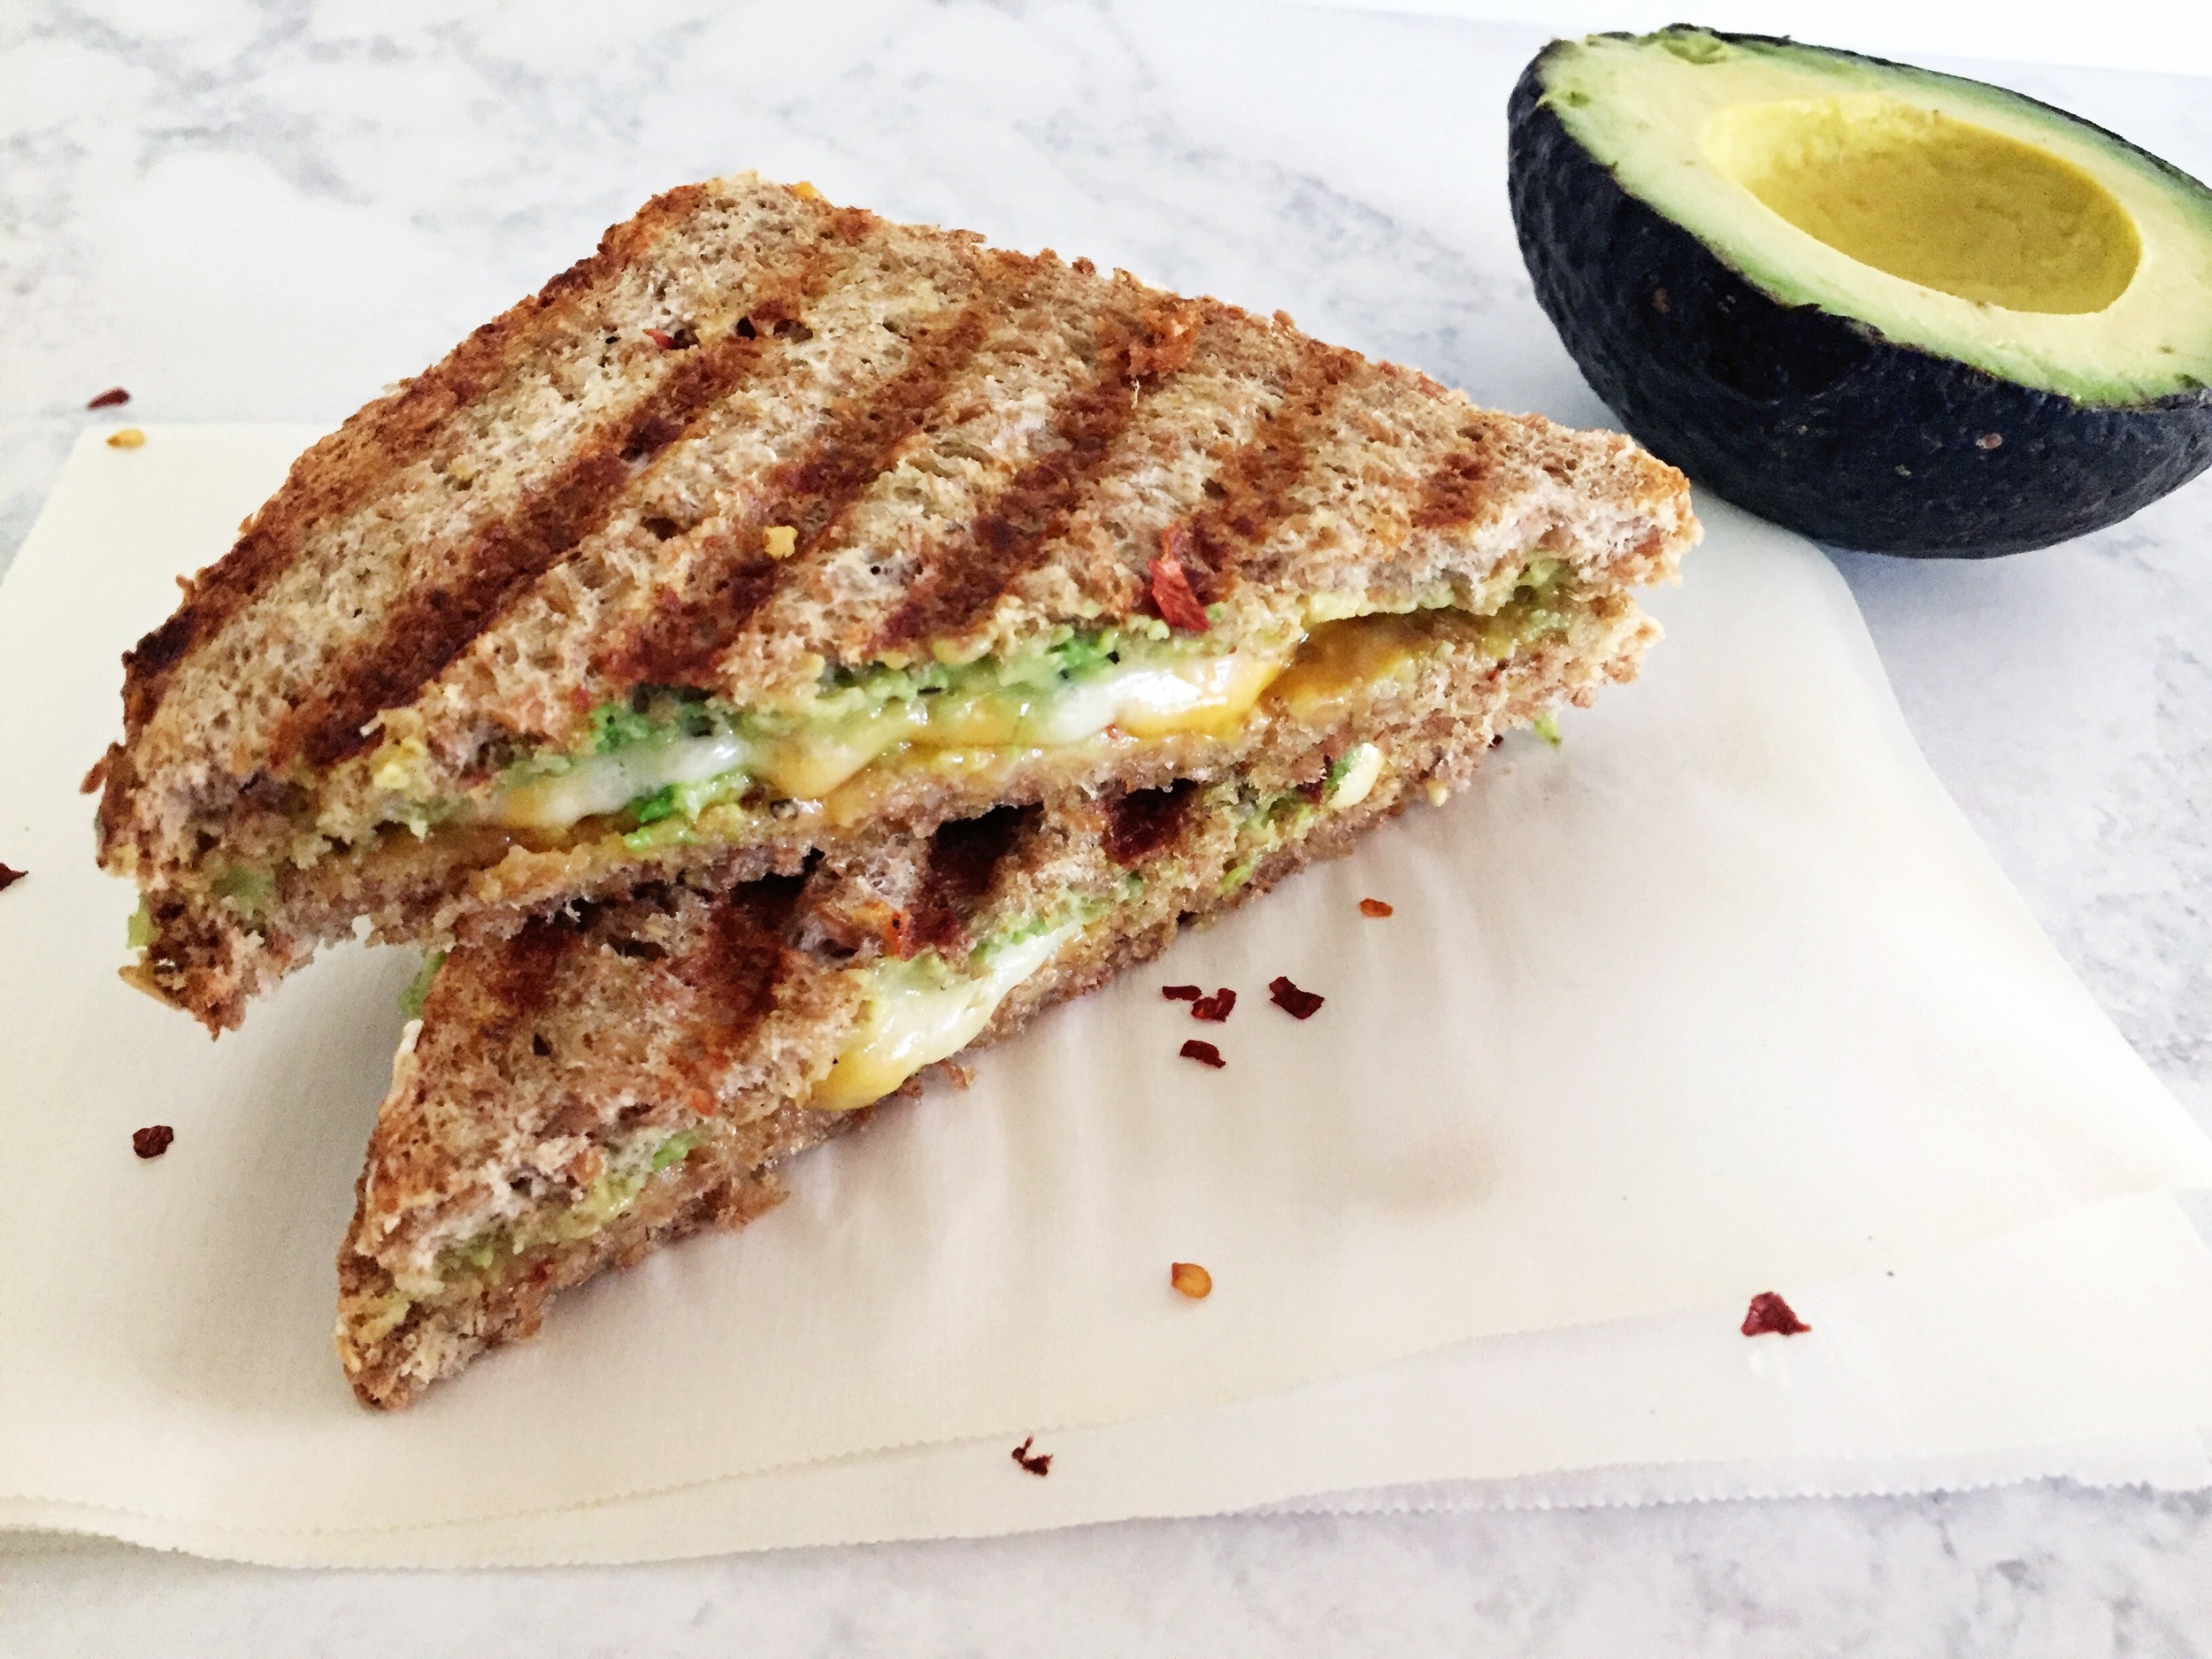
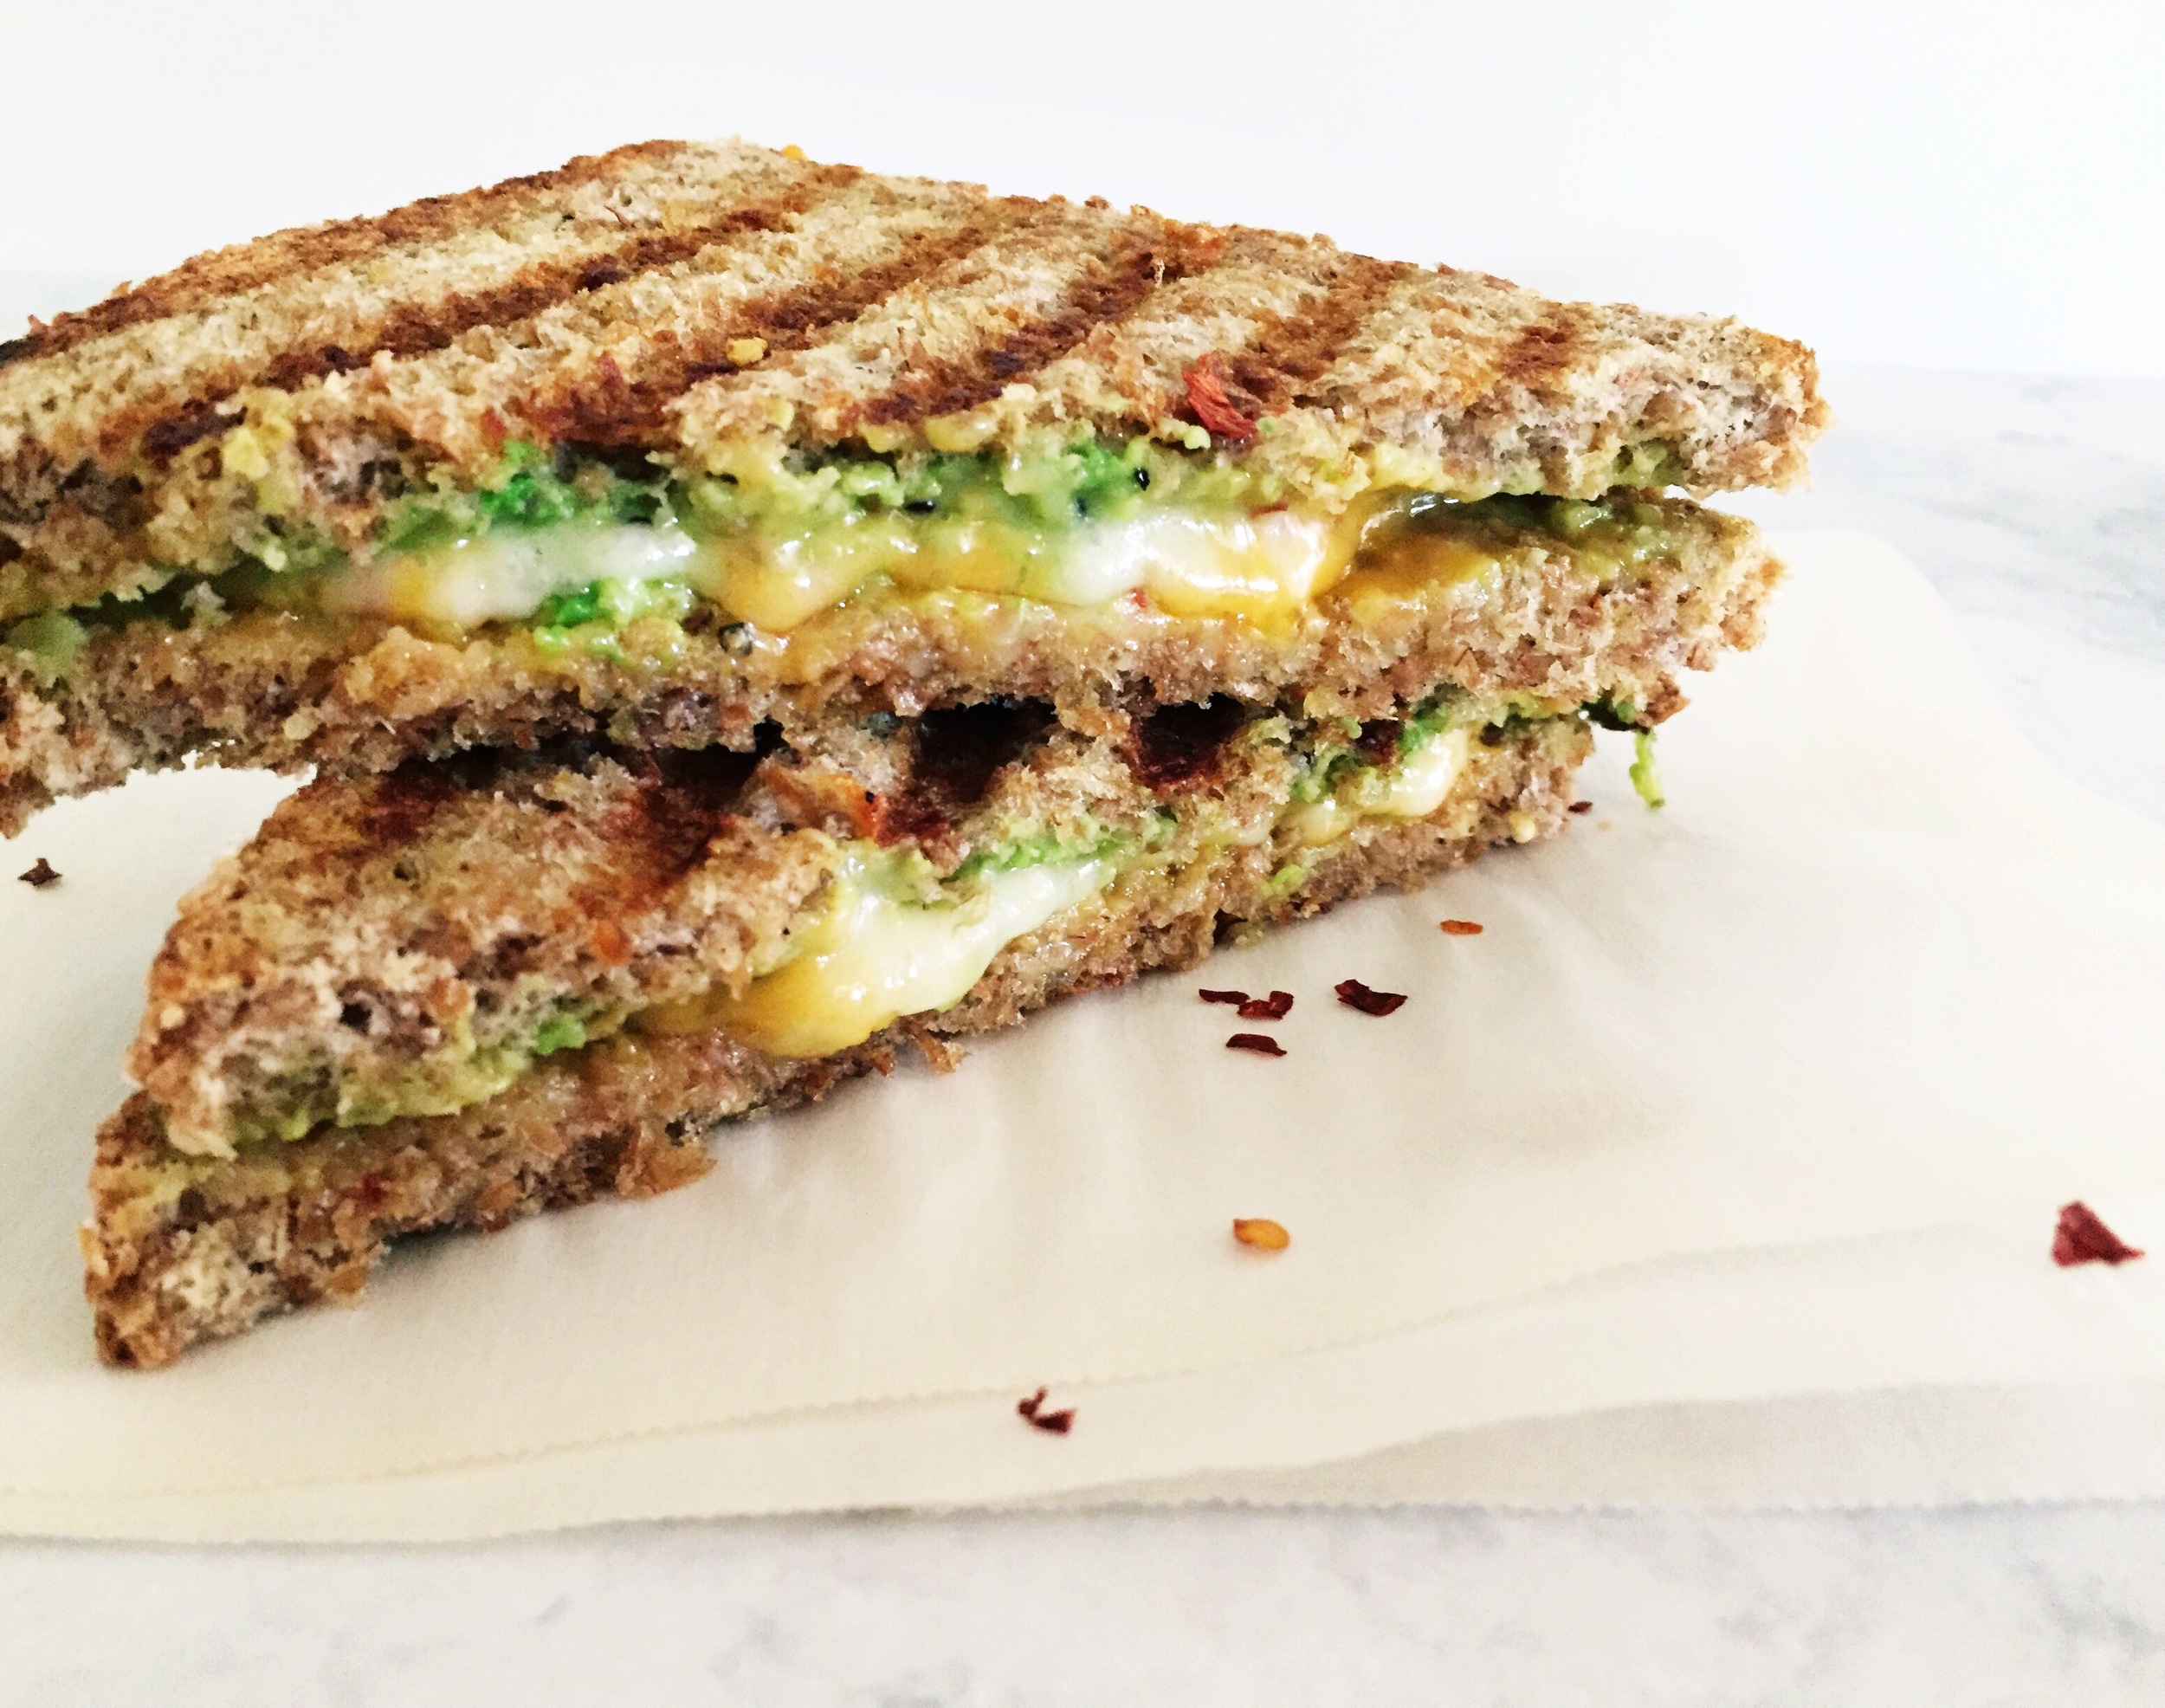
I took a piece of the ever so trendy avocado toast and paired it with cheddar and pepper jack cheese. I wanted the classic orange color from the cheddar, but the spice from the pepper jack. The avocado doesn't take away from the cheese flavor but instead sort of melts into this buttery smooth layer. It's kind of amazing. 

Avocado Toast Grilled Cheese
yields 2 sandwiches

Ingredients:
4 slices of your favorite bread (this is what I use)
1 cup grated pepper jack (buy a block of cheese then grate it)
1 cup grated sharp cheddar
1/2 avocado
red pepper flakes
salt and pepper
olive oil

Directions:
Turn on your panini press or heat a grill pan over medium heat. 

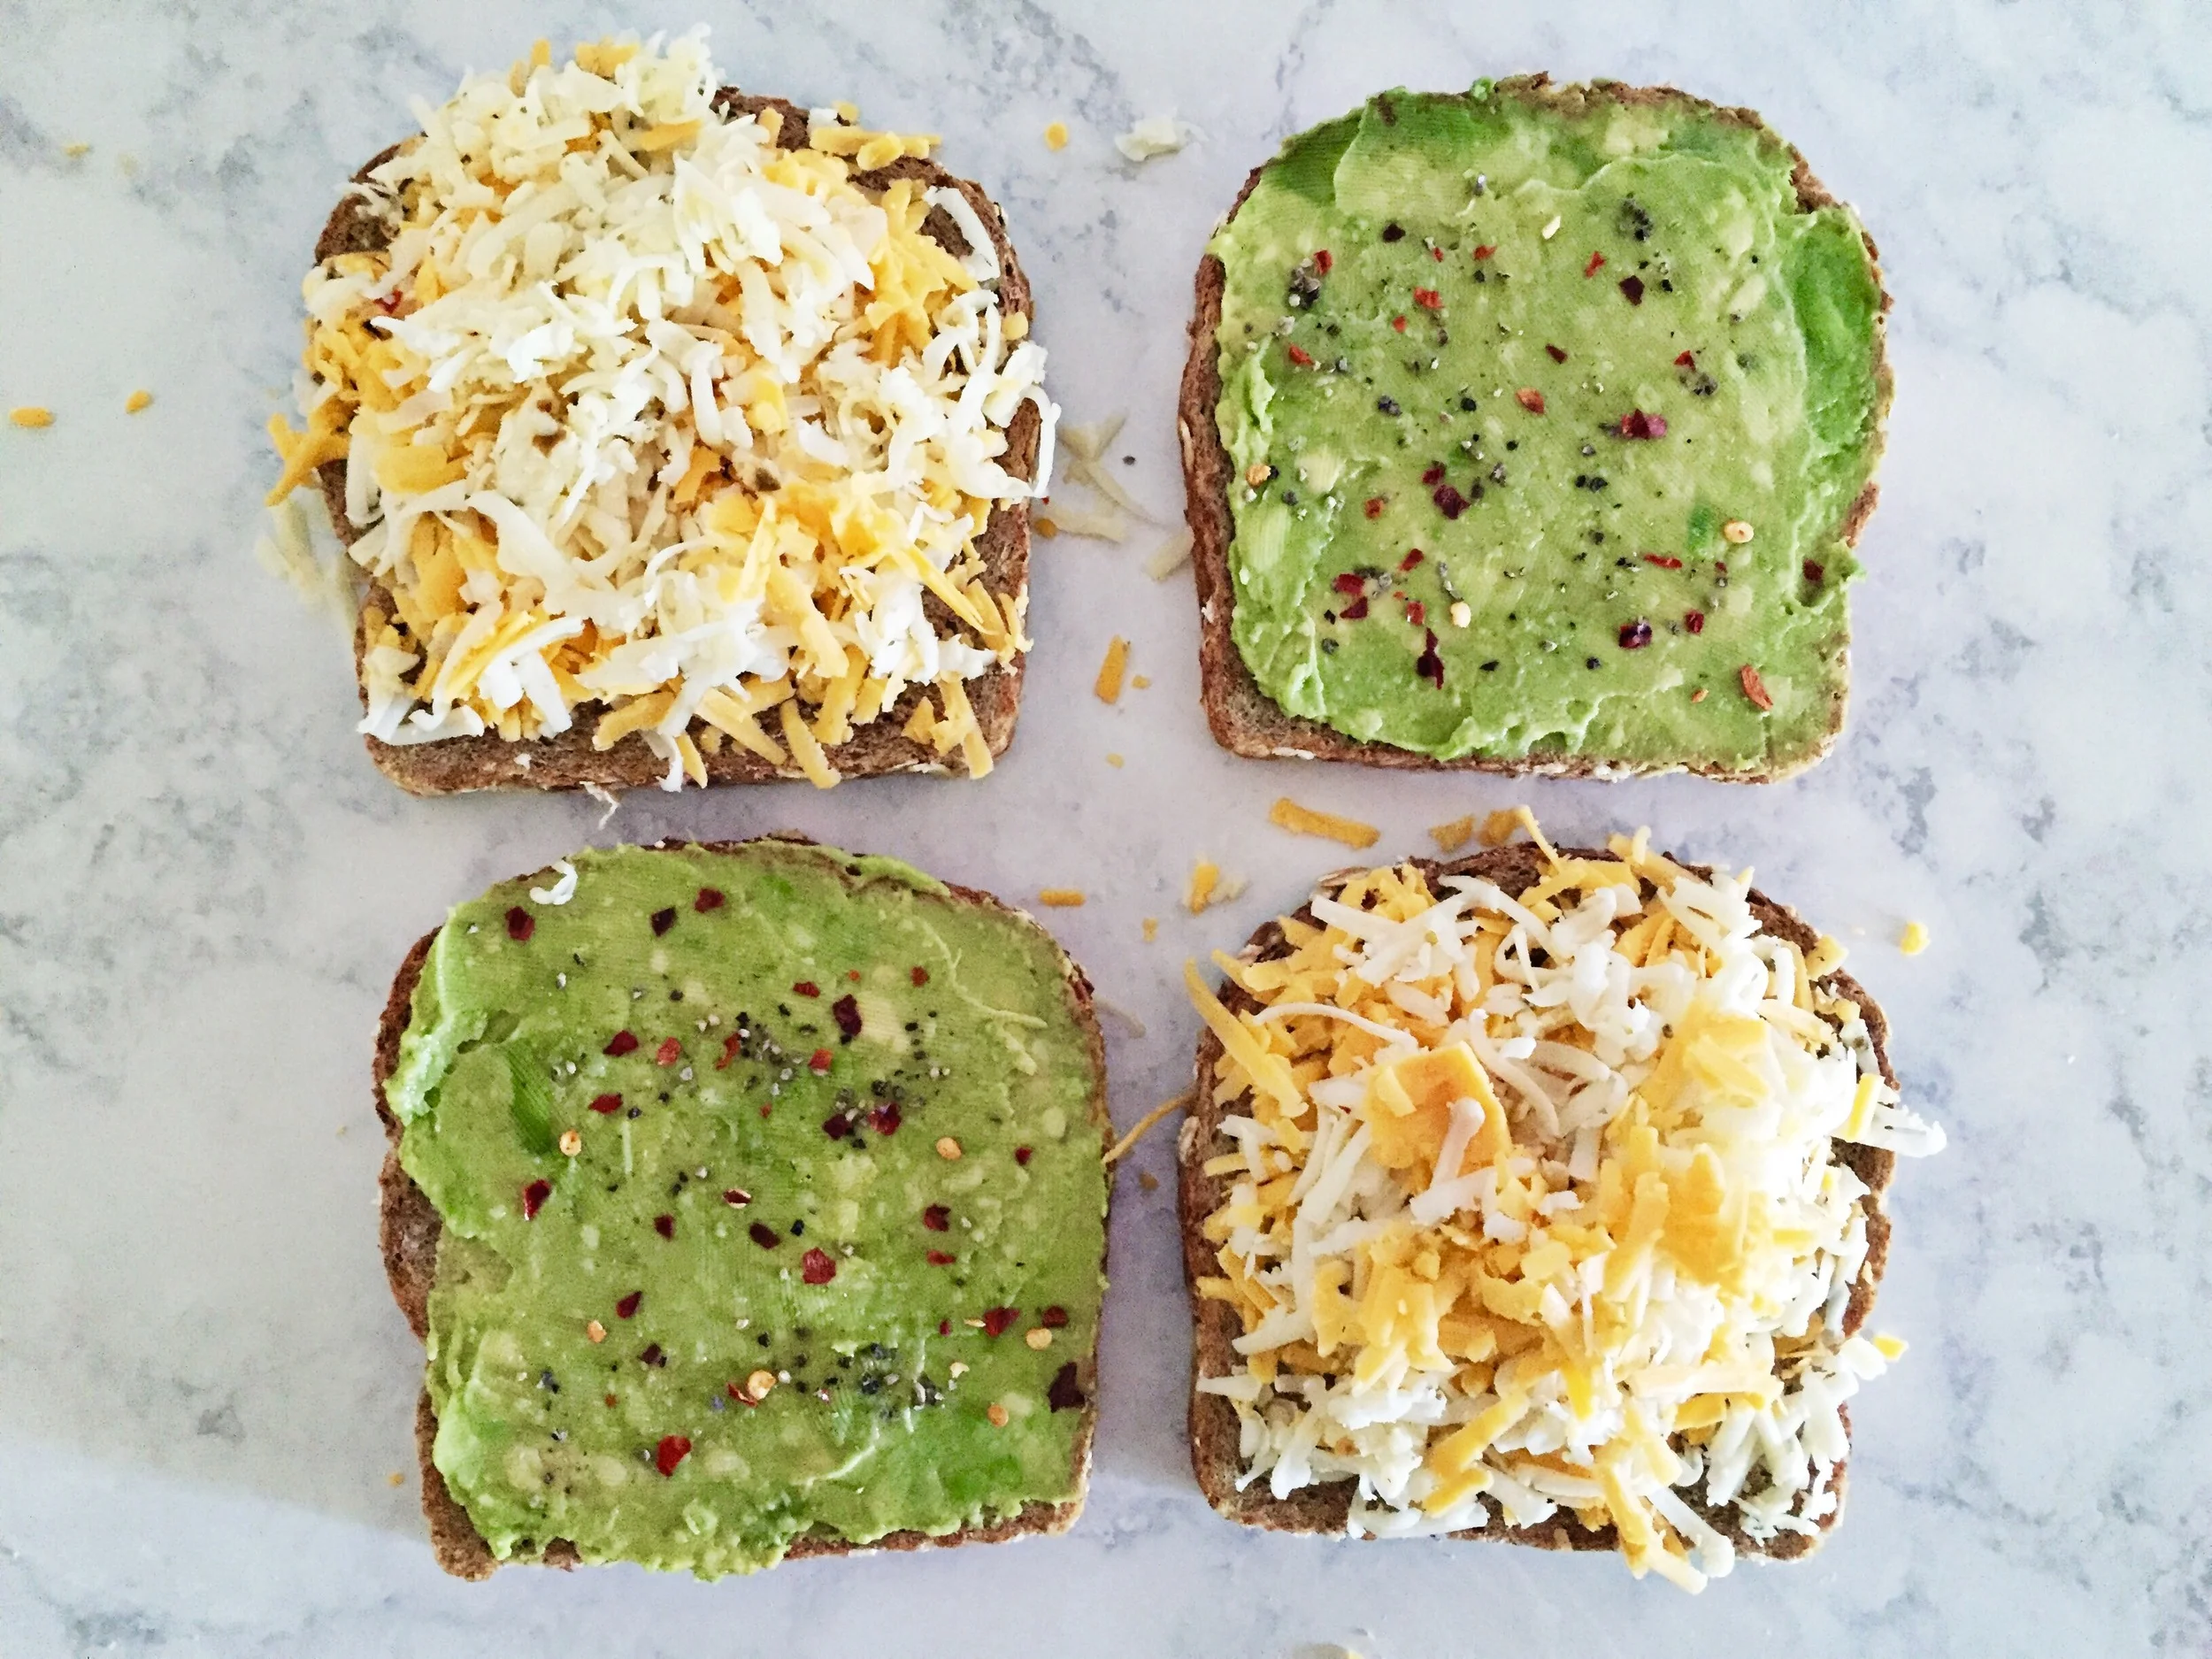
Using a box grater, shred both cheeses and set aside. Take each slice of bread and brush olive oil on one side. Olive oil side down, pile a mixture of the cheeses on 2 slices. Mash 1/4 of the avocado on the remaining 2 slices. Sprinkle with salt, pepper and red pepper flakes. 

Top the cheese bread slices with the avocado bread slices. 

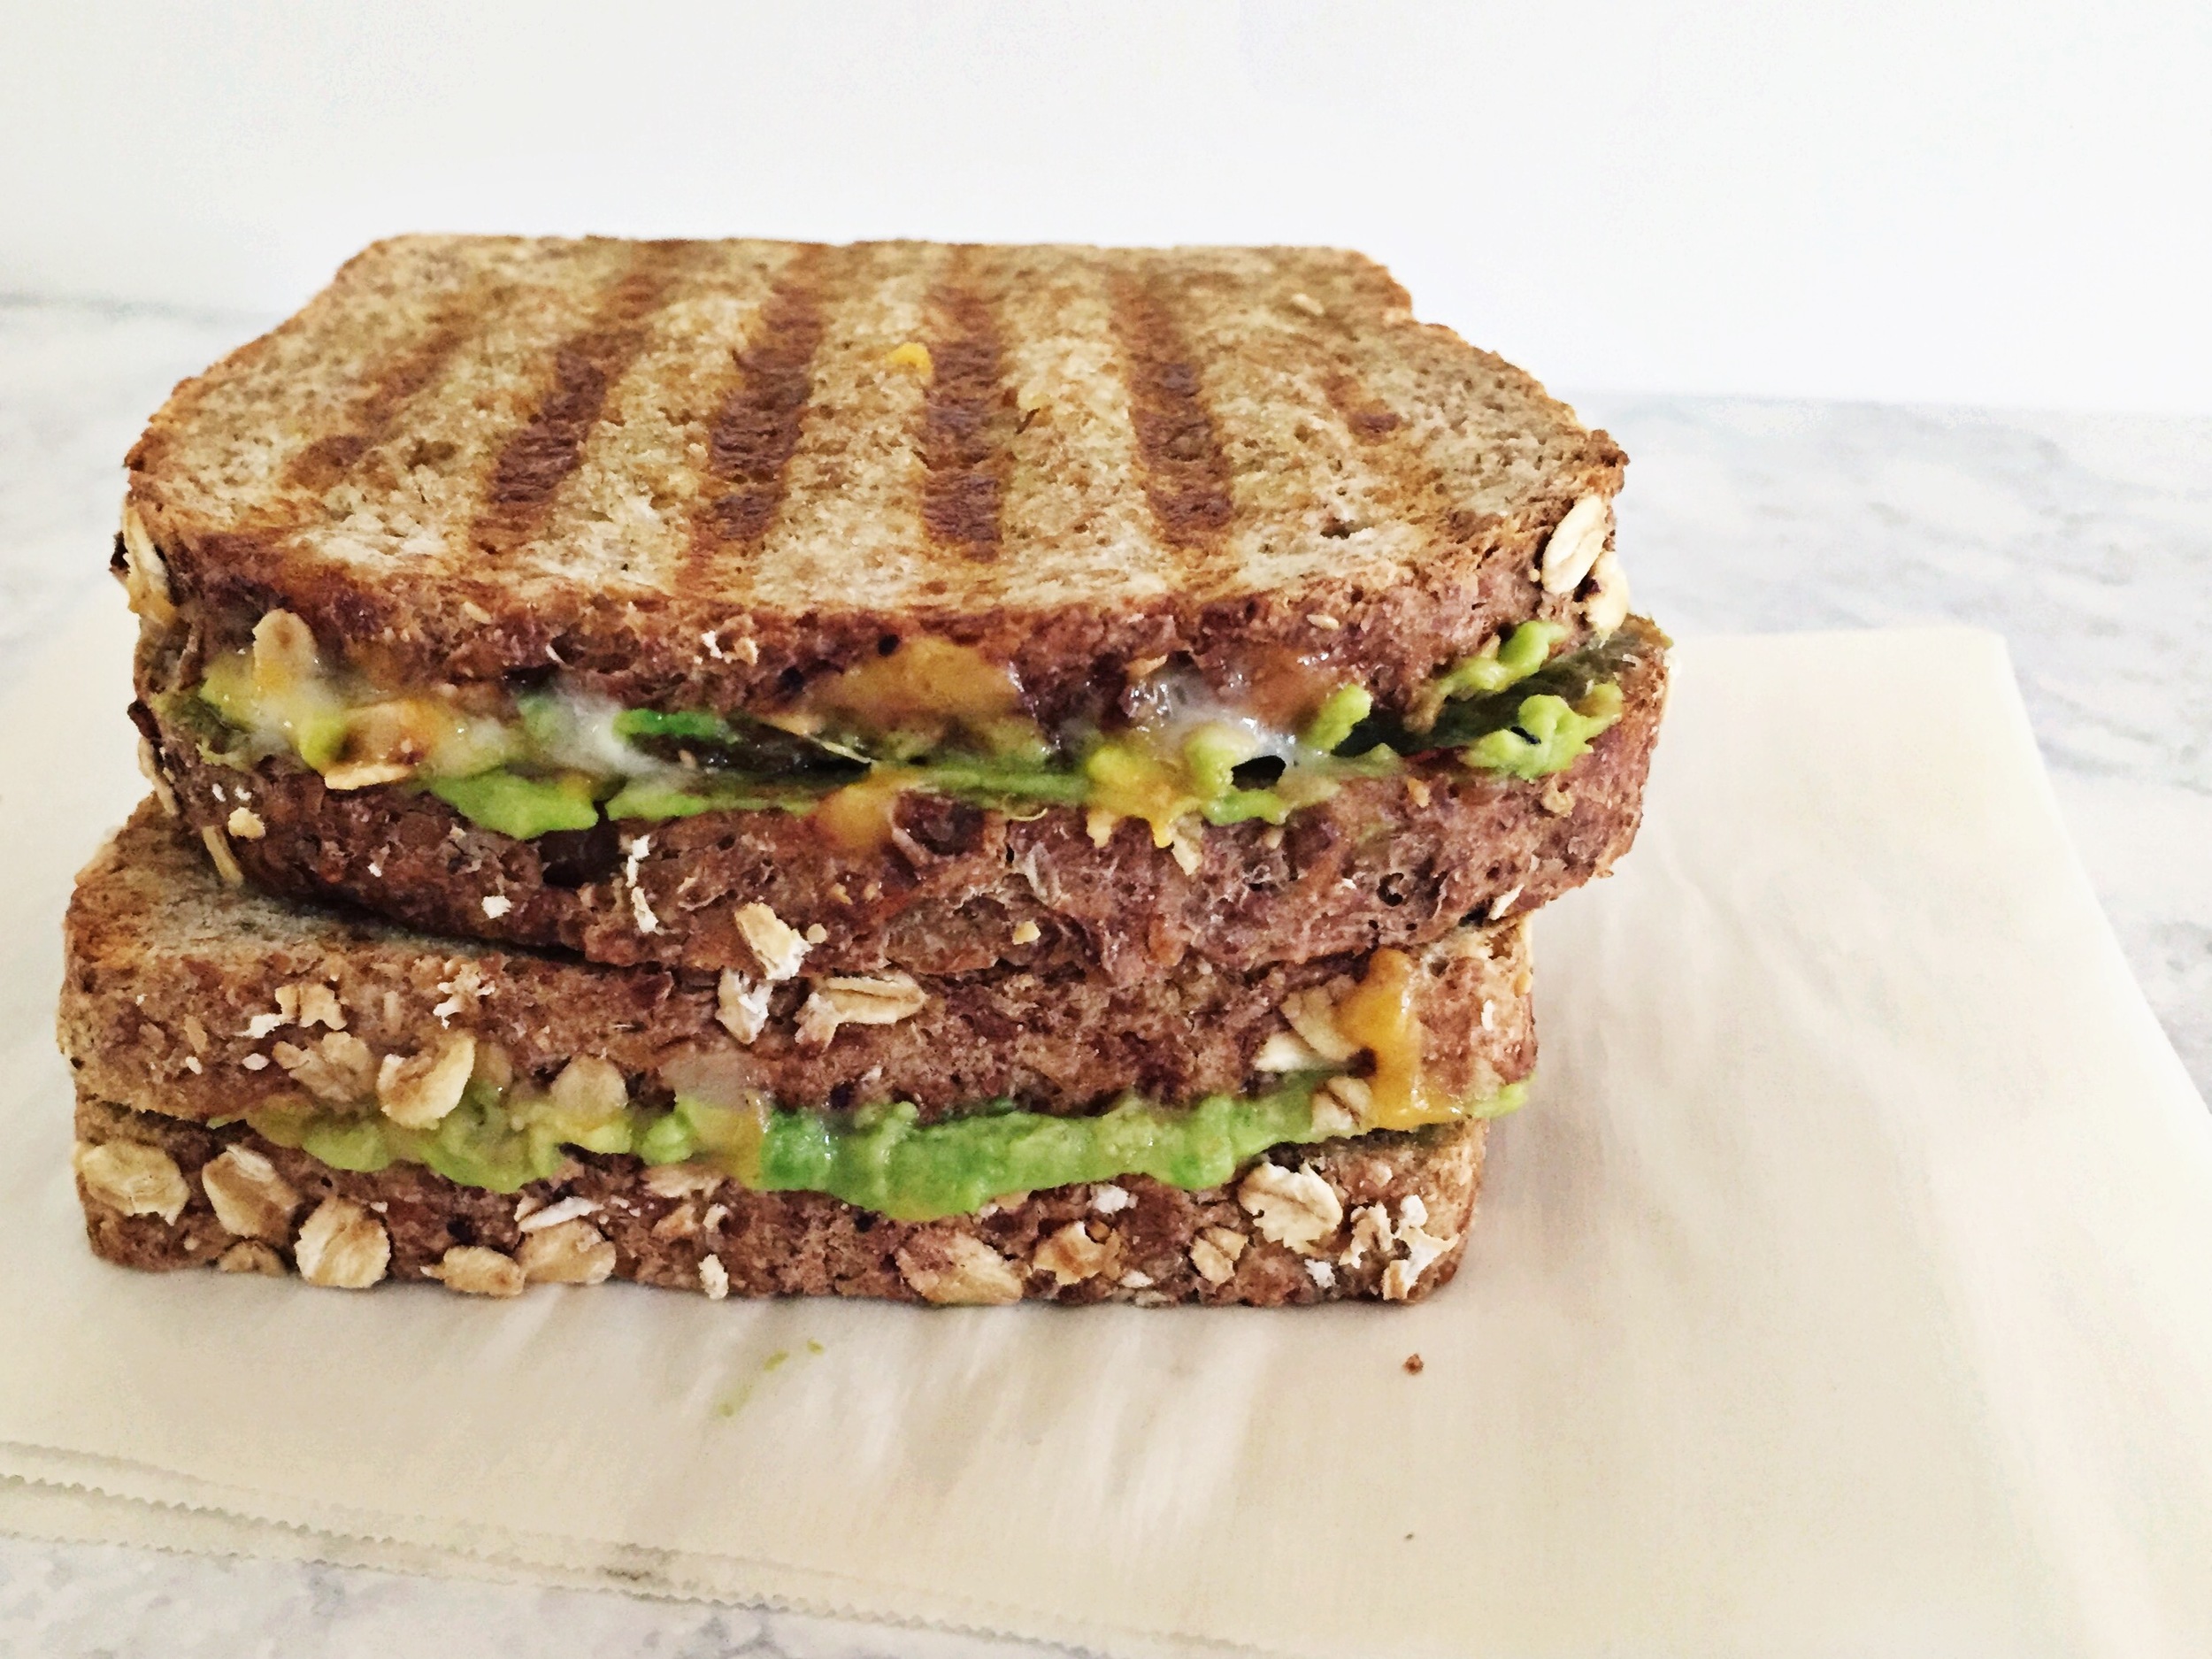
Put on the panini press until golden brown and the cheese is melted. Cut diagonally and serve. 

So William Webster does this satisfy your trendy grilled cheese request?

Annie

Perfect Chocolate Chip Cookies

You guys, I did it. I finally found my perfect chocolate chip cookie recipe. If you have been reading this blog over the past few months you will know I have been on the hunt for a go-to CCC recipe. After several attempts, the test has come to an end. All previous recipes deserve some attention, but this one is it. Check out my recipe testing here, here and here

I wanted my cookies to be full of chocolate chips, just crisp on the bottom and around the edges, cooked but still soft on the inside, pretty to the eye and about 3 inches in diameter. I am pleased to tell you, I have achieved it. 

I also wanted my CCC to be no fuss. This was the most important aspect for my cookie recipe. No secret ingredients, no refrigerating, no weird flours, just a to the point recipe that makes excellent cookies. I promise you this recipe is easy and full of basic ingredients you already have in your cabinet. 

One of my favorite parts of these cookies is not having to wait for your butter to come to room temperature. Simply cut up 2 sticks of unsalted butter and melt it over low heat. You don't even have to let the melted butter cool, it just goes straight into the other ingredients. This is everythingggg.

One little spin I did do (which is optional) was chopping up my chocolate chips slightly. It's nothing crazy, I just like getting those little small flecks of chocolate throughout the dough. 

Keep reading for the steps on how to make these perfect, no fuss, chocolate chip cookies.

Perfect Chocolate Chip Cookies
yields 32 cookies, adapted from Seven Spoons by Tara O'Brady

Ingredients:
1 cup unsalted butter, diced
3 1/4 cups all purpose flour
1 1/4 tsp. baking powder
1 tsp. baking soda
1 1/2 tsp. salt
1 1/2 cups light brown sugar, firmly packed
1/2 cup granulated sugar
2 eggs
1 Tbsp. vanilla extract
12 ounces, semi-sweet chocolate chips, chopped (optional)*

Directions:
Preheat your oven to 350 degrees. Line baking sheets with parchment paper and set aside. 

Place a saucepan on low and melt your butter, stirring occasionally. Make sure the butter does not get too hot to where it sizzles or bubbles.

In a medium bowl, whisk together the flour, baking powder, baking soda, and salt. Set aside. In a large bowl mix both sugars. Pour the melted butter into the bowl with the sugars and whisk until smooth. Add the eggs, one at a time, whisking to combine. Stir in the vanilla.

Slowly add the dry ingredients into the butter sugar mixture. I found a wooden spoon to be the easiest for this job. Once the dough has almost come together, but still a little floury, add the chocolate chips.
*I roughly chopped my chocolate chips, so I could get more chocolate in each bite. I also love those little shavings of chocolate sprinkled through the dough! 

Form 2-3 tablespoon size balls. I used a standard size cookie scoop, but would scoop twice, then roll them together to form one big ball of dough. Place them on a cookie sheet about 2 inches apart. Do not overcrowd the pans. I got 8 balls of dough on a pan, at most. 

Bake for 9-11 minutes, rotating the pan around halfway through. Bake until just slightly golden. 

They are almost bakery-perfect in my opinion. I was soooo happy with how they came out. I'll be coming back to this recipe from now on.

I solicited a lot of taste tasters to make sure I wasn't just dreaming on how perfect they were and all came back saying, "this is it." The test is over. These CCCs are here to stay!

I mean just look at that. Full of chocolate chips, a crispy bottom and perfectly cooked but still soft inside.

Now go make yourself some of the best chocolate chip cookies. Bonus points if you make them for your momma for Mother's Day this weekend. Please share with me on social media if you do! #takeabite

Annie

Spaghetti Squash Korean Kimchi Bowl

I wasn't originally planning on posting this, but after snapping this dinner on snapchat (annietucker93 <-- if you don't follow me) I got enough responses asking for the recipe. So, here we go. 

While Claire was in town we made homemade kimchi and also had dinner at our favorite new Korean spot. With Korean food on the brain and two big containers of kimchi, we did a little research on ways we could use it up. Claire is easily the most experienced eater in the family having been to Japan, Morocco, Australia and more. I always love to hear what she has been eating and cooking!

I came up with the recipe for this kimchi bowl inspired by different rice and noodle bowls I saw. Having just bought a spaghetti squash and being borderline obsessed with spaghetti squash, it seemed like the perfect base. It all kind of came together by throwing the contents of my fridge into a bowl, but it worked. 
**Read the directions all the way through first, so you can get the flow of when things should be made. 

Spaghetti Squash Korean Kimchi Bowl
yields 2 servings

Ingredients:
1 spaghetti squash
1/2 cup edamame, thawed
1/2 cup shredded carrots (about 6 baby carrots)
1/2 cup kimchi
2-3 cups spinach
2 eggs
1 garlic clove, minced
olive oil
salt & pepper
seasme seeds

Sauce:
2 Tbsp. tamari
1 tsp. sesame oil
2 tsp. chili paste
1 garlic clove

Directions:
1. Preheat your oven to 400. Cut the spaghetti squash in half, and scrape out the seeds. Rub with olive oil and season with salt and pepper. Place face down in a baking dish and bake for 35-45 minutes. Here is a step by step tutorial. Or (I cheat) you can just pop it in the microwave for 5-10 minutes like I do.

2. When your squash has about 15 minutes to go, start to prepare your add-ins.

3. Thaw your edamame if frozen and grate your carrots on a box grater, set aside.

4. Heat a tiny bit of olive oil in a small pan over medium. Add in your minced garlic clove then the spinach and sautΓ©e until wilted. I splash in a little bit of water at the end to flash fry it a bit. 

5. Once your squash is done cooking it is time to prepare your soft boiled egg. You want this to be the last thing you do. To make the perfect soft boiled egg, place a small sauce pan filled with water over high heat. Once it comes to a boil, carefully drop in the eggs. Keep the water boiling and set your timer for 6 minutes, no minutes more. Let cook while you prepare your bowl.

6. Use a fork to create strands of spaghetti squash and get out of the skin. In a small bowl whisk tamari, sesame oil, chili paste and 2 Tbsp. water. In the same pan you cooked your spinach in, toss the spaghetti squash with the sauce until it is all covered and heated through. Place the squash in a bowl and then layer in the spinach, edamame, carrots, and kimchi.

7. At this point your timer should be going off. Take the egg out of the hot water with a slotted spoon and run under cold water. Peel your egg, carefully. Slice in half and add the runny egg to your bowl. Sprinkle it all with sesame seeds and serve!

Annie

CB&J Smoothie

image.jpg

The taste is similar to the childhood classic peanut butter and jell, but with cashew butter and blueberries this smoothie is brought up to age and multiplied in health benefits. It is a recreation of my current fav from our local smoothie place, Organic Squeeze.  The menu may allege it to be "kid friendly" but that doesn't mean adults can't enjoy it too. 

image.jpg

I took oldest sis to Organic Squeeze after a spin class while she was in town last week. I insisted she try the CB&J. She loved it. One of my roommates and I are hooked on this flavor too, so I've been set on recreating it. With a few rounds of testing I think I got it to taste to be just like the original. 

P.S. the pink himalayan sea salt is key! It gives it that little salty bite you find in a PB&J sandwich! And I find no problem with having pink salt around the house. 

image.jpg

CB&J Smoothie
yields 1 smoothie, inspired by Organic Squeeze

Ingredients:
1 cup almond milk, depending how thick you like it
1/2 cup frozen blueberries
1/2 frozen banana
1 Tbsp. cashew butter
2 Tbsp. oats
1 tsp. flax seeds
pinch of pink Himalayan sea salt
handful of ice

Directions:
Throw all your ingredients in a blender and blend until smooth.

image.jpg

Annie

Best Banana Bread

Banana bread is like a blanket. One bite feels like that moment when you first tuck your feet into bed and pull the covers up to your neck. Warm, cozy and comfortable...

How bout that poem? Ya it was a stupid as you were thinking it was. But in all honesty banana bread is an ultimate comfort food. Anything you can eat for breakfast, dessert or a snack is a win!

This recipe makes some tasty batter and even better bread. You will get one or two loaves from this recipe depending on the size of pan you use. I like to use the disposable foil pans you can find at the grocery store and bake up a couple of loaves. Wrapping one up and using as a hostess gift and freezing the other to pull out for breakfast when I have company in town.

Banana Bread
yields (1) 9x5in or (2) 8x4in loaves

Ingredients: 
6 Tbsp. unsalted butter, softened
1 1/2 cup white sugar
2 eggs
4 tsp. milk
1 tsp. vanilla extract
3-4 overripe bananas
2 cups all purpose flour
1 tsp. baking soda

Directions:
Preheat your oven to 350 degrees. Grease one or two loaf pans, depending on what size you are using, with cooking spray and set aside.

In the bowl of an electric mixer, beat sugar and butter on medium for two minutes. Scrape the sides then add the eggs one at a time. Add the milk, vanilla and bananas then mix. The batter will look a little lumpy and curdled but that's right!

Add the flour and baking soda and mix. Scrape down the sides and make sure everything is combined. Divide the batter among the two loaf pans, making sure to save a little bit to lick the bowl:) For (2) 8x4 pans bake for 45 - 55 minutes, for (1) 9x5 pan bake for 55 -65 minutes, until a knife is inserted into the middle and comes out completely clean.

*Saves in the freezer really well just wrap in foil then place in a large ziplock baggy. When you are ready to eat, just pull out and let it thaw on the counter. 

Annie